How to Replace Door Hinges: Complete Guide
Door hinges don't last forever. Schlage puts the average lifespan at 10 to 15 years, and after that the knuckle develops play, the pin gets rough, or the leaves bend enough that no amount of screw-tightening fixes the sag. You can replace door hinges yourself in 10 to 20 minutes per door for a straightforward swap -- or closer to an hour if the new ones need fresh mortises cut into the jamb. The real trick is buying the right replacement before you start. Wrong size, wrong corner radius, or wrong finish means a second trip to the hardware store.
When to Replace Door Hinges
Not every hinge problem calls for a replacement. Loose screws are fixable. A squeak just needs lubrication. But certain signs mean the hinge itself is done:
Grab the door near the top hinge and try to wiggle it. If there's play -- even a little -- the knuckle barrel is worn out, and no pin swap or screw trick will fix it permanently. Other signs: the hinge leaves are visibly bent (hold a straightedge across to check), the pin surface feels rough or pitted from corrosion (common on bathroom and exterior doors), or two or more screw holes on the same hinge are stripped.
Schlage estimates that a typical residential door hinge lasts 10 to 15 years with normal use. Exterior doors and high-traffic interior doors wear out faster, especially if the original hinges were plain-bearing steel rather than ball-bearing. Bathroom doors are another trouble spot -- the humidity accelerates corrosion on the pin and knuckle, and you'll often find pitting on the pin surface before the hinge has even hit the ten-year mark.
How to Choose the Right Replacement Hinge
The easiest way to buy the right replacement hinge is to take one of the old ones to the hardware store and match it. But if you're ordering online, three measurements matter: size, corner radius, and finish.
Size. Standard interior doors (1-3/8 inches thick) use 3.5-inch butt hinges. Exterior doors (1-3/4 inches thick) need 4-inch hinges. DK Hardware publishes a detailed size chart and adds that door weight also matters: doors under 50 pounds work fine with plain-bearing hinges, while doors between 50 and 75 pounds should get ball-bearing hinges for smoother operation.
Corner radius. Hinges come in three corner styles: square, 1/4-inch radius, and 5/8-inch radius. The corners need to match the shape of the existing mortise. Here's the quick test: hold a dime against the corner of the old hinge. If the curve matches, it's a 1/4-inch radius. A quarter matches 5/8-inch radius. No curve at all means square corners.
Finish. Match the hinge finish to the rest of the door hardware -- knob, deadbolt, and any other visible hardware on the same door. Common finishes include satin nickel, matte black, oil-rubbed bronze, and satin brass.

Hinge Count by Door Height and Weight
The general rule is one hinge for every 30 inches of door height. A standard 80-inch door gets three hinges, which is what you'll find on most homes built in the last 40 years. Doors shorter than 60 inches can get by with two. Doors between 90 and 120 inches -- common on double-height entries or French doors -- need four.
If the door you're working on has only two hinges and it keeps sagging, consider adding a third in the middle rather than just swapping the existing pair. The added support distributes the weight more evenly and prevents the new hinges from wearing prematurely.
Replacing Hinges Without Removing the Door
This is the method most homeowners should use. The door stays in the frame the entire time, which keeps the alignment intact and means less heavy lifting. DoorCorner and wikiHow both recommend this approach for simple swaps where the new hinges are the same size as the old ones.
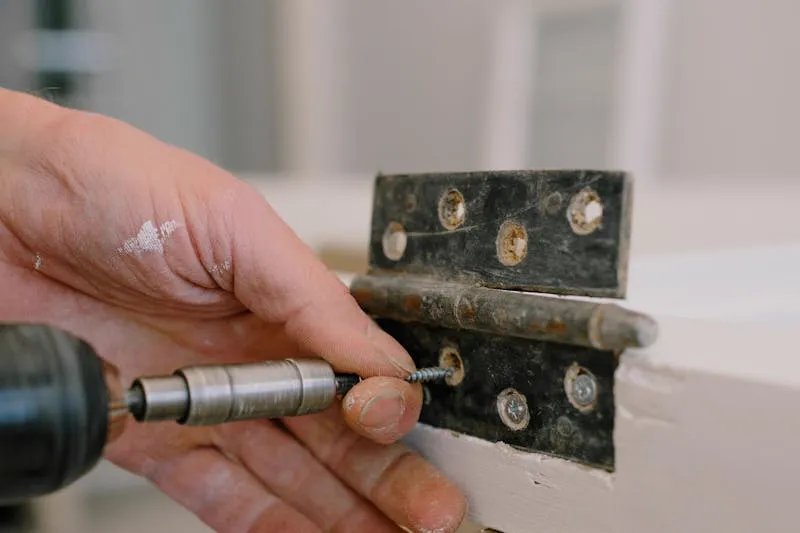
Close the door. Starting with the bottom hinge, remove all the screws from both leaves -- the door-side leaf and the frame-side leaf. Lift the old hinge out of the mortise. Set the new hinge in the same recess and drive the screws in, starting with the frame side so the door hangs properly before you secure the door side. Move to the middle hinge, then the top.
The critical rule when you replace door hinges: do one at a time. The remaining hinges hold the door in position while you swap each one. If you remove all the hinges at once, the door falls and you have to rehang it from scratch -- a two-person job that takes far longer.
Pre-drill pilot holes before driving screws, even if you're reusing the old holes. Angi's expert reviewer Robert Tschudi notes that pre-drilling prevents the wood from splitting and keeps the screws aligned, which is especially important with brass screws that are softer than steel and prone to snapping under torque. For heavier doors, Tschudi recommends upgrading at least one screw per hinge to a longer 2-to-3-inch screw that reaches the wall stud behind the jamb. This anchors each replacement hinge more securely than the standard 1-inch screws that only grip the jamb wood.
Replacing Hinges with a New Mortise
If the replacement hinges are a different size from the old ones, or if the existing mortises are damaged, you'll need to cut fresh mortises. This takes more skill and about an hour per door.
Two methods work. The traditional approach uses a sharp chisel and hammer: score the outline of the hinge leaf with a utility knife (more precise than a pencil line, per This Old House), make closely spaced chisel cuts across the mortise as deep as the hinge leaf thickness, then hold the chisel at a low angle and shave out the waste. Test-fit the hinge leaf -- it should sit flush with the edge of the door or jamb, not below it and not above it.
The faster method uses a router with a flush-cut bearing bit and a hinge template. Family Handyman's Joe Cruz prefers this for accuracy: set the router bit depth to the template thickness plus the hinge leaf thickness, test on a scrap piece first, and route the mortise in one clean pass. If you're replacing hinges on multiple doors, the router pays for itself in time saved.
If you cut a mortise too deep, pack a thin piece of cardboard behind the hinge leaf as a shim. A cereal box works well -- it's roughly 1/16 inch thick, which is usually enough to bring the hinge back to flush. Stack two layers for more correction. If the mortise is too shallow, the hinge leaf will sit proud of the surface and prevent the door from closing -- pare away a bit more with the chisel until the leaf sits flush with the surrounding wood.
Common Mistakes When Replacing Door Hinges
Buying the wrong size is the mistake people make most often when they replace door hinges, and the coin test prevents it entirely. Measure the old hinge before ordering -- don't guess based on the door size alone, because some older doors use non-standard hinges.
Skipping pilot holes is the second most common problem. Without a pilot hole, the screw can wander, split the wood, or strip the hole before it's fully seated. Use a drill bit slightly thinner than the screw shaft. Family Handyman recommends a self-centering drill bit, which sits inside the countersink of the hinge leaf's screw hole and drills perfectly centered every time.
Over-tightening screws causes more problems than most people realize. Once the screw head is flush with the hinge leaf, stop. Driving it further crushes the wood fibers around the hole, weakening the grip and making it more likely to strip out under the door's daily load. Use a hand screwdriver for the last turn rather than trusting the clutch on a drill.
Finally, don't force the hinge pin all the way in during reinstallation. Angi notes that driving a pin too aggressively can cause squeaking. Tap it gently until it seats -- if it resists, pull it back out and apply a drop of lubricant before trying again.
If you're also dealing with squeaky door hinges, the replacement process is the perfect time to clean the mortise, check for stripped holes, and apply lubricant before installing the new hardware.

Get our door hardware maintenance checklist -- a printable guide to keeping every hinge, latch, and strike plate in your home quiet and working smoothly.
References
- "How to Install or Replace Door Hinges." wikiHow. Co-authored by Mark Spelman. Updated February 19, 2026.
- "How to Install Door Hinges Step by Step." Angi. Updated November 8, 2024.
- "A Complete Hinge Size Guide." DK Hardware. Published July 14, 2025.
- "Door Hinge Buying Guide." Schlage.
- "Hinge Buying Guide." Lowe's. Updated April 19, 2023.
- "How to Recess Hinges on a Door." Family Handyman. Updated October 8, 2024.
- "How To Replace an Interior Door." This Old House. Updated May 17, 2025.
- "How to Choose & Replace Door Hinges." DoorCorner.